此功能包含:
1.根据动态路由自动展开与自动选择对应路由所在页面菜单
2.只展开一个子菜单
3.兄弟组件控制菜单与路由
<a-menu
:openKeys="openKeys"
:selectedKeys="selectedKeys"
mode="inline"
theme="dark"
:inlineCollapsed="$store.state.isCollapse"
@click='select'
@openChange='openChange'
>
<a-sub-menu v-for="item in menu" :key="item.name" :index="item.title">
<span slot="title"
><a-icon :type="item.icon" /><span>{{ item.title }}</span></span
>
<a-menu-item
v-for="subItem in item.submenu"
:key="subItem.index"
:index="subItem.index"
>
<router-link :to="subItem.path">
{{ subItem.text }}
</router-link>
</a-menu-item>
</a-sub-menu>
</a-menu>
菜单栏路由配置:
{
     title: 'Dashboard',
     name: '/dashboard',
     icon: 'dashboard',
     submenu: [
      { text: '分析页', path: '/dashboard/analysis', index: '/analysis' },
      { text: '监控页', path: '/dashboard/monitor', index: '/monitor' }
     ]
    }
默认开启的子菜单及选中项配置
openKeys: [this.$route.path.substr(0, this.$route.path.lastIndexOf('/'))],
selectedKeys: [this.$route.path.substr(this.$route.path.lastIndexOf('/'))],
rootSubmenuKeys: ['/dashboard', '/form', '/table', '/user'], // 有几个子菜单项就贴几个
功能代码:
methods: {
  openChange (openKeys) { // 只展开一个子菜单
   const latestOpenKey = openKeys.find(key => this.openKeys.indexOf(key) === -1)
   if (this.rootSubmenuKeys.indexOf(latestOpenKey) === -1) {
    this.openKeys = openKeys
   } else {
    this.openKeys = latestOpenKey ? [latestOpenKey] : []
   }
  },
  select ({ item, key, selectedKeys }) { // 选中项
   this.selectedKeys = [key]
  }
 },
 created () {
  this.$bus.$on('goperson', (url) => { // 组件间通信设置菜单栏状态 此处功能可查看另一篇博客
   this.openKeys = [ url.substr(0, url.lastIndexOf('/')) ]
   this.selectedKeys = [ url.substr(url.lastIndexOf('/')) ]
  })
 }
补充知识:Ant Design Pro 侧边菜单栏 + 路由Router
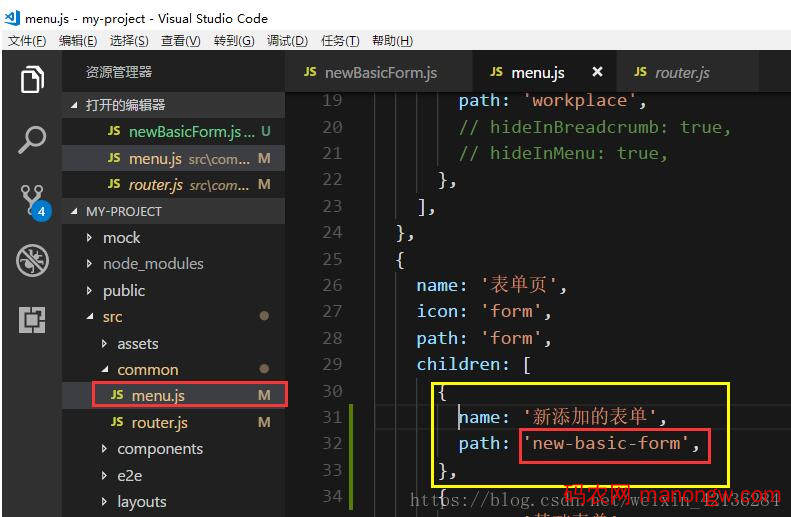
1、 首先找到 menu.js

{
    name: '新添加的表单',
    path: 'new-basic-form',
},
添加从30行-33行代码,然后在你的侧边栏就是多出来一个 “新添加的表单”

但是当你点击的时候,你会发现右边 Main 是404,因为我们还需要配置一下router (代表当我点击“新添加的表单”这个彩蛋的时候,右边需要显示的页面是什么)
2、点击router.JS 在表单页下面 children 添加30行-44行

'/form/new-basic-form': {
   component: dynamicWrapper(app, ['form'], () => import('../routes/Forms/newBasicForm')),
 },
因为链接的是newBasicForm 就需要创建一个newBasicForm.JS
在routes——》Forms——》下创建newBasicForm.js
newBasicForm.js里面的代码为:
import React, { PureComponent } from 'react';
import { connect } from 'dva';
import {
 Form,
 Input,
 DatePicker,
 Select,
 Button,
 Card,
 InputNumber,
 Radio,
 Icon,
 Checkbox,
 Tooltip,
} from 'antd';
import PageHeaderLayout from '../../layouts/PageHeaderLayout';
import styles from './style.less';
const FormItem = Form.Item;

@Form.create()
export default class newBasicForms extends PureComponent {
 handleSubmit = e => {
  e.preventDefault();
  this.props.form.validateFieldsAndScroll((err, values) => {
   if (!err) {
    this.props.dispatch({
     type: 'form/submitRegularForm',
     payload: values,
    });
   }
  });
 };

 render() {
  const { getFieldDecorator, getFieldValue } = this.props.form;

  const formItemLayout = {
   labelCol: {
    xs: { span: 24 },
    sm: { span: 7 },
   },
   wrapperCol: {
    xs: { span: 24 },
    sm: { span: 12 },
    md: { span: 10 },
   },
  };

   return (
    //  这个个组件 自带头
    <PageHeaderLayout
    title="new-基础表单"
    content="表单页用于向用户收集或验证信息,基础表单常见于数据项较少的表单场景。"
    >
    <Card bordered={false}>
      <p>你好我叫刘国富</p>
      <Form onSubmit={this.handleSubmit} hideRequiredMark style={{ marginTop: 8 }}>
      <FormItem {...formItemLayout} label="标题">
       {getFieldDecorator('title', {
        rules: [
         {
          required: true,
          message: '请输入标题',
         },
        ],
       })(<Input placeholder="给目标起个名字" />)}
      </FormItem>
      </Form>
    </Card>
    </PageHeaderLayout>

   );
  }
 }
当点击新添加的表单,右边则显示为:你好我叫刘国富。

以上这篇ant design vue导航菜单与路由配置操作就是小编分享给大家的全部内容了,希望能给大家一个参考,也希望大家多多支持码农网。


